Summary
Connect a Linux computer to a pfSense firewall with an OpenVPN shared key tunnel. The OpenVPN tunnel allows communication with a remote client behind a firewall you don’t control. Scripts are also provided to allow the remote client to use the home network DNS when connected to the tunnel.
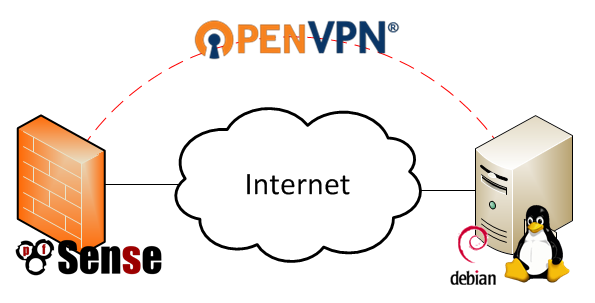
OpenVPN Tunnel From pfSense to Debian Linux Diagram
Background
I wanted a way for my Orange Pi backup server (post coming soon) to reach my home network without needing to alter anything in the office firewall. I also didn’t want to have to open up any ports on my home firewall for the backup server to reach my home network. The solution? A VPN tunnel between the offsite server and my home network using the pfSense firewall’s built in OpenVPN functionality.
I decided to go with the most simple OpenVPN configuration which uses a static pre-shared key on each end of the connection to create a secure tunnel. You might see this configuration referred to as a “site-to-site” or “point-to-point” VPN elsewhere. OpenVPN documentation suggests that this configuration is less secure than the other possible OpenVPN configurations because it requires you to manually distribute the key securely, as well as compromises all past and future traffic if the key is compromised. I am fine with those trade-offs since I am more interested in obfuscation of the the traffic than security of the traffic.
In order to replicate this setup you will need the following :
- A Remote client you want to connect to your network running Linux (my remote client was running Debian)
- A pfSense firewall on your local network to terminate the OpenVPN tunnel
- You could also terminate to a Linux OpenVPN server, but that’s not how my network is setup
Configuring the pfSense Firewall as an OpenVPN Server
Configuring the pfSense side is pretty easy with the GUI. Navigate to your pfSense firewall and login as an administrator. The OpenVPN settings are under VPN->OpenVPN. I setup pfSense as the server in my case since it has a publicly resolvable DNS entry.
Click the + under the Server tab to add a new entry and use the following settings:
- Server Mode: Peer to Peer (Shared Key)
- Protocol: UDP
- Device Mode: tun
- Interface: WAN
- Local port: 1194
- Shared Key: Automatically Generate Shared Key (You will copy this to the Linux Client later)
- Encryption Algorithm: I used AES-128-CBC (128-bit) which was the default
- IPv4 Tunnel Network: Some private network not currently used, I used 192.168.2.0/24
- IPv4 Local Networks: Your LAN, I used 192.168.1.0/24
I left all others default. Click Save to create the entry. Then click the e to edit the entry and grab the pfSense generated shared key. You will want to save this on the client under /etc/openvpn/.
Configuring the Remote Client
First, your remote Linux client needs OpenVPN installed. In Debian (as root), this is as simple as:
apt-get install openvpn
The Debian package is setup to automatically start OpenVPN as a service on system start. It also scans /etc/openvpn for .conf files which it will attempt to start upon the service starting. I take advantage of this behavior for my configuration.
Instead of going through the learning process I went through, I’m going to walk you through my finished setup which consists of the following files. All of the files have had generic info inserted so as not to share identifying network information.
root@offsitebackupserver:/etc/openvpn# ls
restoredns.sh myvpn.conf  myvpndns.sh  myhome.resolve.conf  homedomain.com.key
- restoredns.sh – a script to restore the DHCP provided DNS server if the tunnel goes down
- myvpn.conf – the configuration script for the VPN, ran when the OpenVPN service starts (in Debian anyways)
- myvpndns.sh – a script to swap out resolv.conf with one configured for my home network when the tunnel is up
- myhome.resolv.conf – the resolv.conf used by the myvpndns.sh script
- homedomain.com.key – the pre-shared static key file for the VPN
homedomain.com.key
This is a key file in the following format:
root@offsitebackupserver:/etc/openvpn# cat homedomain.com.key
# # 2048 bit OpenVPN static key #
-----BEGIN OpenVPN Static key V1-----
BUNCH OF GIBBERISH IN HERE
-----END OpenVPN Static key V1-----
My key was generated by pfSense because I set that side up first. Alternatively you can run the following command in your shell:
openvpn --genkey --secret homedomain.com.key
myvpn.conf
The myvpn.conf file is the primary configuration file for the VPN tunnel. It includes information such as the remote host, the cipher type, and some settings related to keeping the tunnel alive and scripts to run up and down events for the tunnel.
remote homedomain.com  #dynamic DNS ensures that this will be reachable even though its a DHCP service
dev tun  #use a tunnel device (must match on both ends of the tunnel)
cipher aes-128-cbc  #the cipher to use (must match on both ends of the tunnel)
ifconfig 192.168.2.2 192.168.2.1  #local ip address followed by remote IP address
route 192.168.1.0 255.255.255.0 192.168.2.1  #add a route for the home network
secret /etc/openvpn/homedomain.com.key  #path to pre-shared key file, should match on both sides
keepalive 10 60
persist-tun
persist-key
script-security 2 system  #required to allow us to run system commands in the script
up /etc/openvpn/myvpndns.sh  #when the VPN tunnel comes up, switch to my home DNS server
down /etc/openvpn/restoredns.sh  #when the VPN tunnel goes down, restore the DHCP DNS client
up-restart  #run the up script when the tunnel restarts
You’ll note that my remote setting is for a domain name. This points to my home Internet connection which has dynamic DNS running for the remote client to resolve. The other interesting settings in the file relate to the up and down scripts.
I don’t use static IPs for my servers at home and instead rely on DHCP with dynamic DNS entries to my PFSense router. This means I don’t have to remember any IPs and can just remember the hostnames I give to all my virtual machines. This is great on the local network, but doesn’t help my mini backup server at all since it will be getting its DNS locally via DHCP. I created the up and down scripts to get around this. They basically work by copying in a different /etc/resolv.conf when the tunnel connects, and switching back to the DHCP entry when the tunnel goes down.
myhome.resolv.conf
This is the resolv.conf that is copied in by the up script myvpndns.sh. It has the domain and search entries set to the home domain, and uses the pfSense LAN address as the nameserver.
domain homedomain.com
search homedomain.com
nameserver 192.168.1.1
myvpndns.sh
The script to swap out resolv.conf is really simple. Copy the existing file to a .bak, then copy in /etc/openvpn/myhome.resolv.conf to replace the /etc/resolv.conf generated by dhclient.
#!/bin/bash
cp /etc/resolv.conf /etc/resolv.conf.bak
cp /etc/openvpn/myhome.resolve.conf /etc/resolv.conf
restoredns.sh
The restoredns.sh script simply moves back the original resolv.conf file.
#!/bin/bash
mv /etc/resolv.conf.bak /etc/resolv.conf
Testing
After everything is setup you can test things out by running:
service openvpn restart
service network restart
Then, you can check the state of the tunnel with ifconfig. The tunnel will probably show as tun0.
root@backupserver:/etc/openvpn# ifconfig
...
tun0      Link encap:UNSPEC  HWaddr 00-00-00-00-00-00-00-00-00-00-00-00-00-00-00-00
          inet addr:192.168.2.2  P-t-P:192.168.2.1  Mask:255.255.255.255
          UP POINTOPOINT RUNNING NOARP MULTICAST  MTU:1500  Metric:1
          RX packets:11 errors:0 dropped:0 overruns:0 frame:0
          TX packets:11 errors:0 dropped:0 overruns:0 carrier:0
          collisions:0 txqueuelen:100
          RX bytes:898 (898.0 B)  TX bytes:716 (716.0 B)
You can see that the addresses correctly match the configuration file settings. Some pings will make sure that the tunnel is passing traffic.
root@offsitebackupserver:/etc/openvpn# ping 192.168.2.1
PING 192.168.2.1 (192.168.2.1) 56(84) bytes of data.
64 bytes from 192.168.2.1: icmp_seq=1 ttl=64 time=47.7 ms
64 bytes from 192.168.2.1: icmp_seq=2 ttl=64 time=46.0 ms
64 bytes from 192.168.2.1: icmp_seq=3 ttl=64 time=52.3 ms
64 bytes from 192.168.2.1: icmp_seq=4 ttl=64 time=50.1 ms
^C
--- 192.168.2.1 ping statistics ---
4 packets transmitted, 4 received, 0% packet loss, time 3004ms
rtt min/avg/max/mdev = 46.041/49.050/52.334/2.398 ms
root@offsitebackupserver:/etc/openvpn# ping backup
PING backup.homedomain.com (192.168.1.223) 56(84) bytes of data.
64 bytes from backup.homedomain.com (192.168.1.223): icmp_seq=1 ttl=63 time=46.7 ms
64 bytes from backup.homedomain.com (192.168.1.223): icmp_seq=2 ttl=63 time=53.2 ms
64 bytes from backup.homedomain.com (192.168.1.223): icmp_seq=3 ttl=63 time=47.4 ms
64 bytes from backup.homedomain.com (192.168.1.223): icmp_seq=4 ttl=63 time=45.4 ms
^C
--- backup.homedomain.com ping statistics ---
4 packets transmitted, 4 received, 0% packet loss, time 3005ms
rtt min/avg/max/mdev = 45.482/48.225/53.223/2.972 ms
Pinging my home backup server based on its hostname worked, which meant my script to swap out resolv.conf was working. I tested the setup by restarting both services a few times in either order, and also rebooted the machine. In all cases the DNS entries swapped out correctly.
I do have one concern which may require further configuration, and that is persisting DNS across the dhclient renewal. If I run into issues, I will update this post with my workaround.
Conclusion
I am very happy with how easy it was to setup OpenVPN and how flexible the configuration is. In the future, I’ll probably explore the other key setups available for OpenVPN, but the pre-shared key is working great for my use case.
Further Reading
Here are some of the sources I used in generating my configuration.
OpenVPN Shared Key Mini How-To – https://openvpn.net/index.php/open-source/documentation/miscellaneous/78-static-key-mini-howto.html
OpenVPN FAQ Page – https://community.openvpn.net/openvpn/wiki/FAQ
OpenVPN Man Page – https://community.openvpn.net/openvpn/wiki/Openvpn23ManPage
pfSense OpenVPN site-to-site How-To – https://doc.pfsense.org/index.php/OpenVPN_Site_To_Site