Introduction
I recently began working with a Mikrotik router OS based device for use in small business. I thought this was the perfect time to try out some cross platform configurations between Mikrotik and pfSense which are both very popular in the hobbyist and small business space.
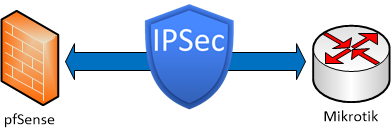
This post will show the steps I used to configure an IPSec tunnel between a Mikrotik router and a pfSense firewall. This is a basic tunnel configuration so traffic will flow freely through the tunnel based on the phase 2 configuration. This is a great configuration if you want to tunnel some traffic between two trusted networks.
The tunnel shown in this configuration is an IPv4 tunnel only, but IPv6 traffic could be added with minor tweaks. A Mutal PSK authentication is used to simplify the configuration.
This configuration has not been audited for maximum security and has not been tested for performance.
Requirements
This configuration is based on the following systems:
- pfSense version 2.4.4
- Mikrotik version 6.46.6
The systems must be able to reach each other over a WAN interface and should have unique LAN IP address ranges. You will also need to add a rule on pfSense to accept the ISAKMP connection on port 500. To be most secure you can create this rule to only allow the peer IP/host.
Configure Phase 1 – pfSense
Of the two platforms pfSense is probably the most logical of the two in how it lays out the configuration. The configuration entries are neat and tidy and nested in the GUI.
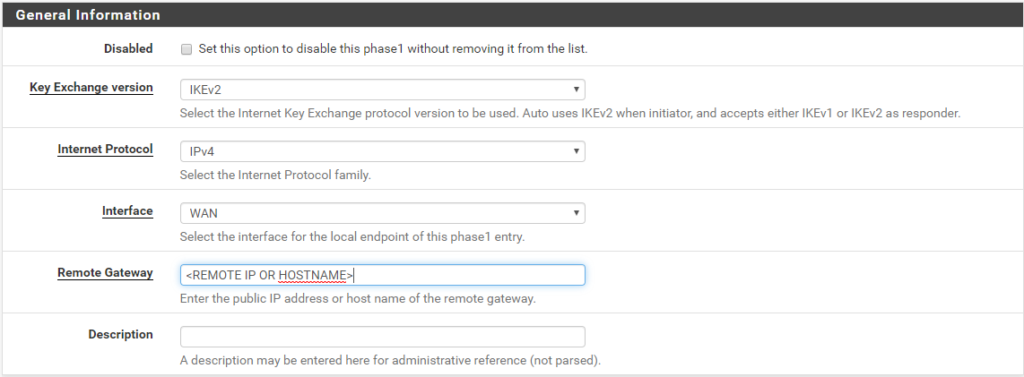
Navigate to VPN -> IPSec -> Tunnel. Then click the Add P1 button to start adding the new phase 1 entry. Then begin filling in the General Information as shown.
- Key Exchange Version: IKEv2
- Internet Protocol: IPv4
- Interface: WAN (or other if applicable)
- Remote Gateway: IP or hostname of the Mikrotik router (I used a hostname)
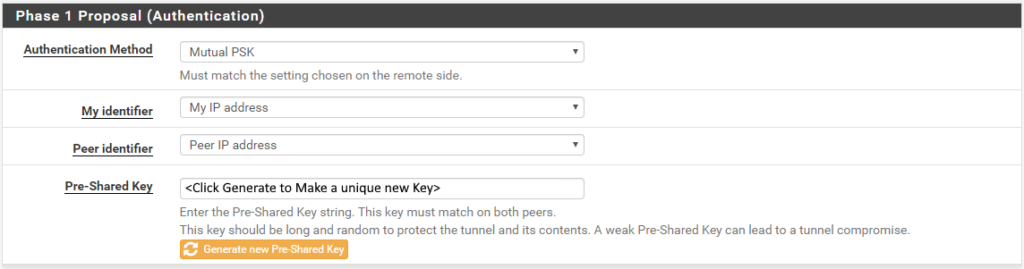
Then fill in the following for the Phase 1 Proposal (Authentication)
- Authentication Method: Mutual PSK
- My identifier: My IP Address
- Peer identifier: Peer IP Address
- Pre-Shared Key: Click the Generate new Pre-Shared Key button to create a key for this tunnel
Next, create/update a Phase 1 Proposal (Encryption Algorithm). You should be able to get by with a single correct entry here.
- Algorithm: AES
- Key length: 128 bits (I’m sure you can go larger as dictated by your requirements)
- Hash: SHA256
- DH Group: 14 (2048 bit)
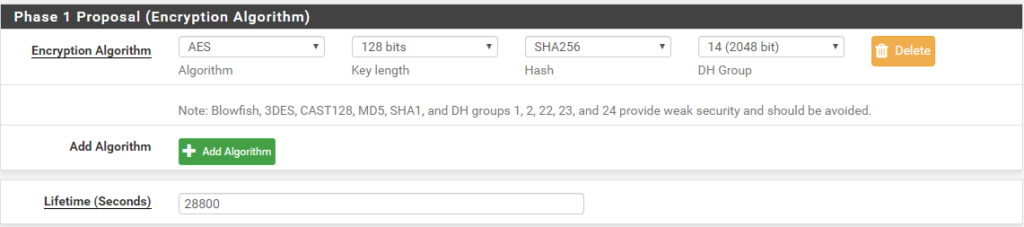
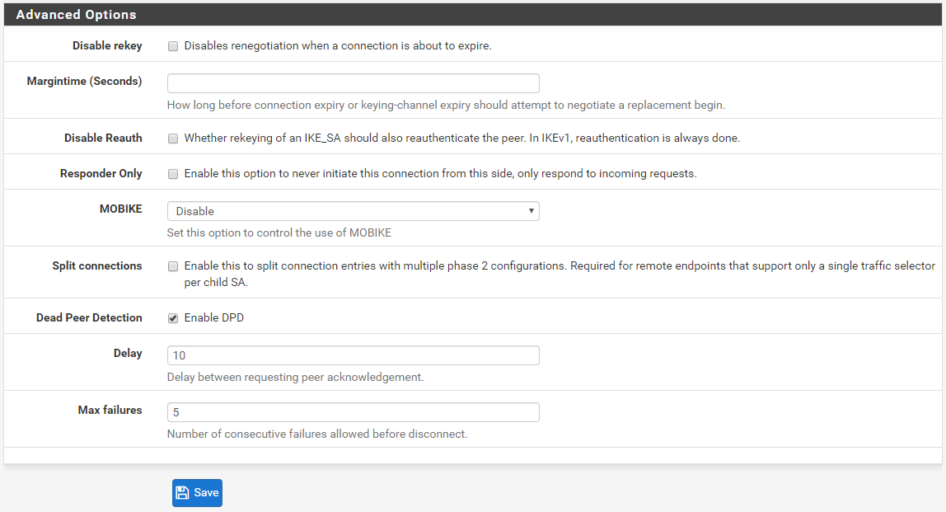
The final step in phase 1 is to go over the advanced options. The defaults should be fine. Then click Save.
Configure Phase 1 – Mikrotik
Configuration of the Mikrotik router is shown through the web GUI that runs on port 80 of the device. Login to your router and navigate to IP -> IPSec. There will be multiple configurations that need created or adjusted.
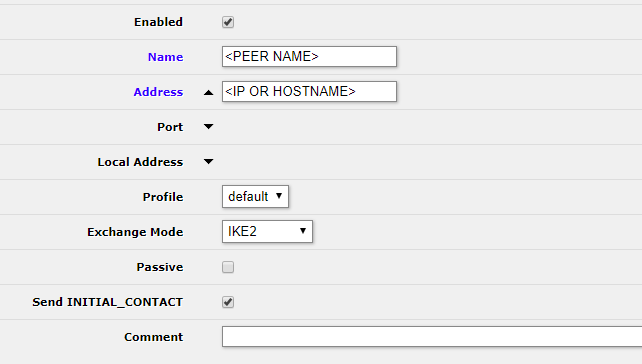
First, we can configure the peer by going to IP -> IPSec -> Peers and clicking Add New. Then fill in the following:
- Name: This can be the hostname or other identified you want to use
- Address: This can be an IP address or hostname
- Port and Local address can be left as default
- Profile can be left as default
- Exchange mode: IKE2
- Passive: Disabled
- Send INITIAL_CONTACT: Enabled
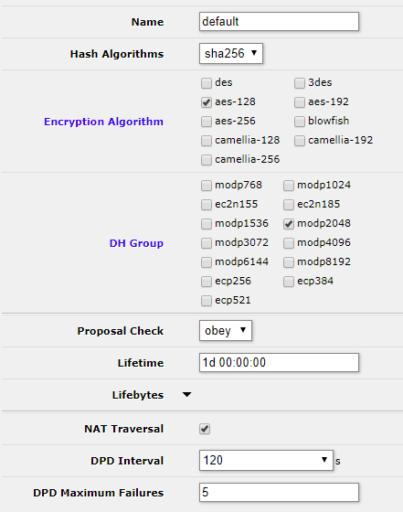
Next we need to update the default profile to match our pfSense settings. Head over to IP -> IPSec -> Profiles and click on default and change the settings as follows. When you are done click OK. Settings not mentioned can remain at default.
- Hash Algorithms: SHA256
- Encryption Algorithm: aes-128
- DH Group: modp2048
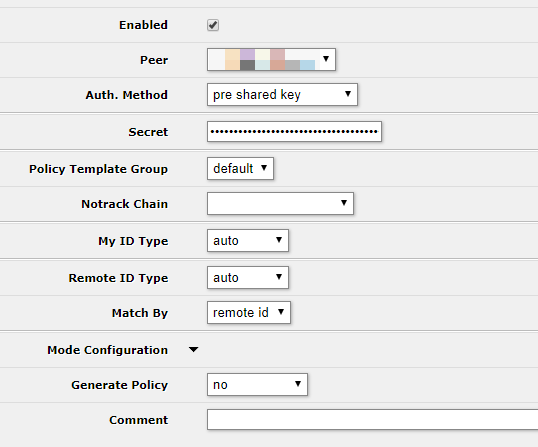
Finally, go over to IP -> IPSec -> Identities and click Add New to create an identity for this tunnel.
- Enabled: Checked
- Peer: The peer you created earlier
- Auth. Method: pre shared key
- Secret: The key generated in pfSense
- My ID Type: auto
- Remote ID Type: auto
- Match by: remote id
Verify Phase 1
Verifying phase 1 will show us that the the devices have connectivity to one another and no firewall rules are blocking the session from being established.
In pfSense go to Status -> IPSec and look for your IPSec session to be Established.
In Mikrotik you can verify the Phase 1 session under IP -> IPSec -> Active Peers. You should see an increasing uptime for the configured session.
Configure Phase 2 – pfSense
Phase 2 is where we tell the firewall how to identify which packets need encrypted and sent to the remote peer. It also contains the configuration of the encryption algorithms to use in transit. To begin adding your phase 2 entry go to VPN -> IPSec -> Tunnels. Find the Phase 1 entry you just created and click the + Show Phase 2 Entries. There shouldn’t be any yet. Then click the Add P2 button.
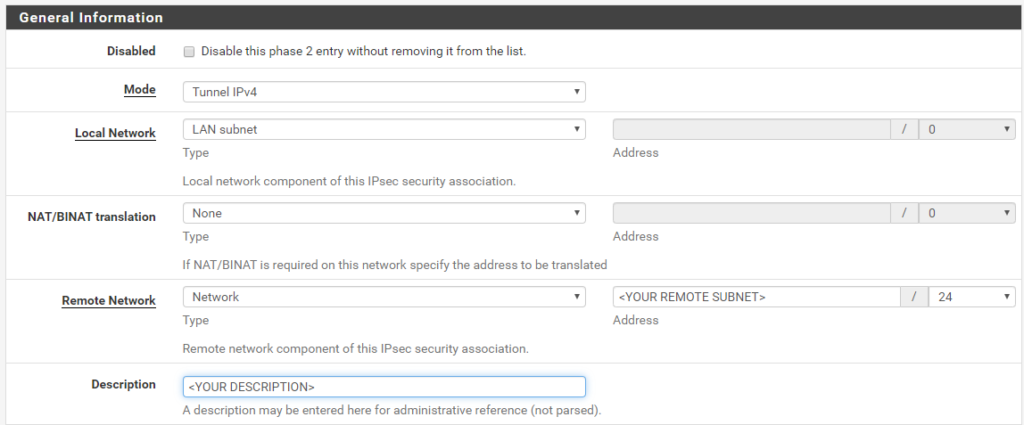
Fill in the General Information as follows:
- Mode: Tunnel IPv4
- Local Network: LAN Subnet (most likely)
- Remote Network: Fill in the LAN subnet behind the Mikrotik that you want to reach from pfSense
Next fill in the Phase 2 Proposal (SA/Key Exchange) as follows:
- Protocol: ESP
- Encryption Algorithms
- AES128-GCM – 128 Bits
- AES192-GCM – Auto
- AES256-GCM – Auto
- Hash Algorithms
- SHA256
- PFS Key Group: 14 (2048 bit)
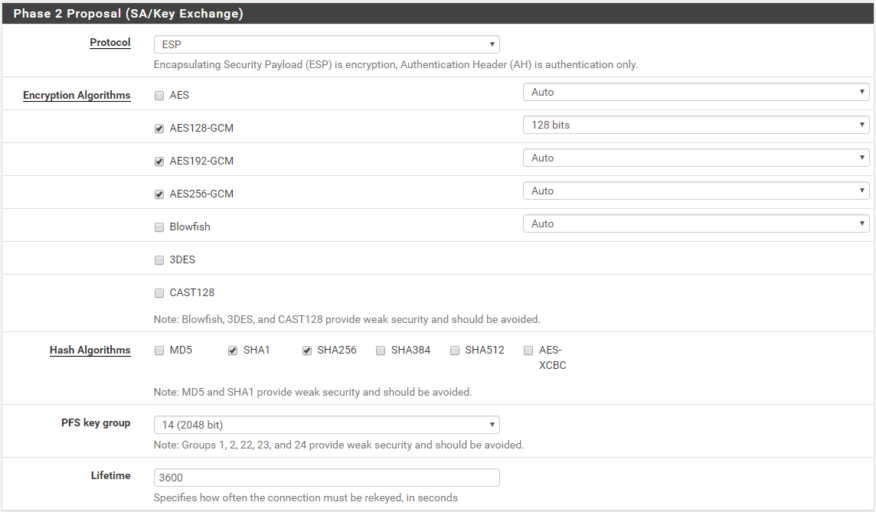
When you are done click Save.
Configure Phase 2 – Mikrotik
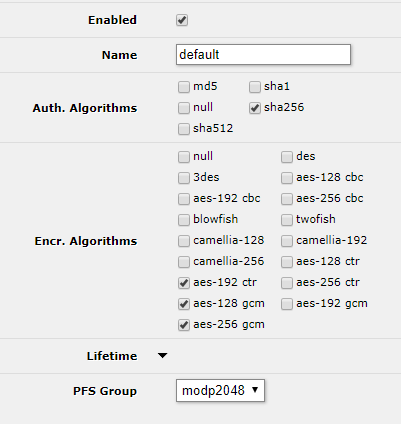
First we need to configure the Mikrotik Phase 2 proposal to match pfSense. Go to IP -> IPSec -> Proposals and click on the default proposal to edit it.
- Auth Algorithms:
- sha256
- Encr. Algorithms
- aes-192 ctr
- aes-128 gcm
- aes-256 gcm
- PFS Group: modp2048
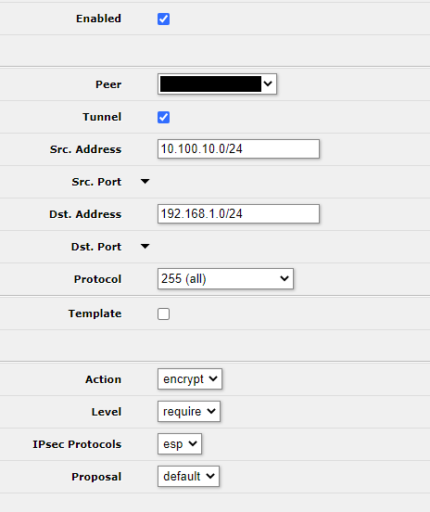
The final step for phase 2 on the Mikrotik is to create a policy. Navigate to IP -> IPSec -> Policies and click Add New. The fill in the settings as follows:
- Enabled: Checked
- Peer: The peer you created
- Tunnel: Checked (If you don’t check this you might lose your remote management, be careful)
- Src Address: Subnet and mask of local subnet to tunnel
- Dst. Address: Subnet and mask of remote subnet to tunnel
- Protocol: 255 (all)
- Action: encrypt
- Level: require
- IPSec Protocols: esp
- Proposal: default
Testing the Configuration
There are two ways to test the tunnel. The most obvious is probably to have a host on one LAN ping a host on the other LAN, this assumes though that you have hosts in both LANs that can ping which might not be the case if one side is remote or a new deployment. You can still test the tunnel though from Mikrotik.
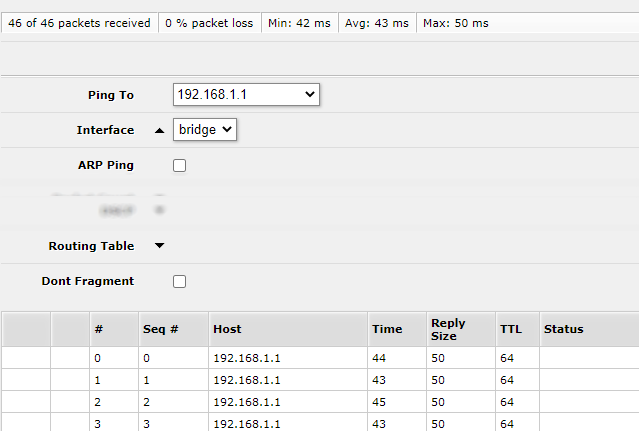
To test from Mikrotik go to Tools -> Ping and setup a ping to the LAN gateway on the pfSense system. In my case the far end LAN is 192.168.1.1. I was able to test it by using the Mikrotik bridge interface as the source interface.
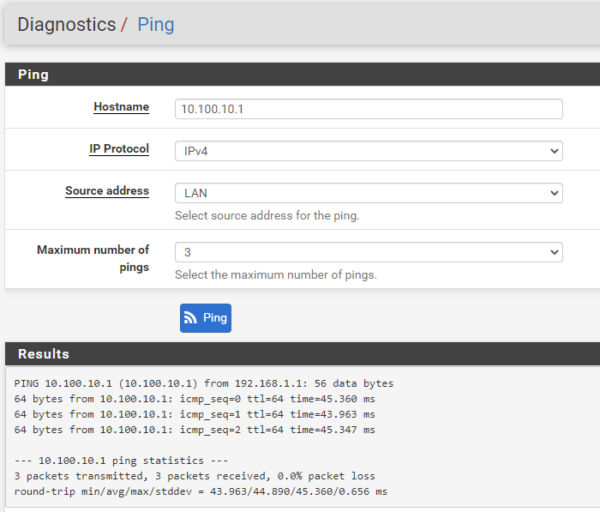
To test from pfSense it’s the same idea, go to Diagnostics -> Ping and use the LAN as the Source address.
Statistics are available on both platforms. In pfSense go to Status -> IPSec, in Mikrotik take a look under IP -> IPSec -> Active Peers.
Conclusion
Configuring a secure IPSec tunnel between Mikrotik and pfSense was not as hard as I expected. Both platforms have plenty of configuration options allowing a secure tunnel to be established with ease. The drawback to this configuration is that there is no logical interface for the connection on either platform, meaning the tunneled traffic is basically assumed to be in a protected zone as it exits the tunnel. This is great if both sides are more or less the same traffic level, but not sufficient if you want to make rules for traffic as it enters on one side or the other. For that reason I am intending on switching to a GRE tunnel with IPSec which will be shown in a later post.
Hi,
great tutorial, but i’m issuing some kind of speed problems over the classic smb share. 🙁
regaerds,
Matjaz
Excellent manual.
Thank you very much